Short throw projectors have revolutionized the way we experience large screen visuals in compact spaces. From home theaters and gaming rooms to classrooms and conference rooms, these projectors allow for big images without requiring long distances. However, to achieve the best picture quality, it is critical to set the correct height and distance. Understanding the right short throw projector distance and projection throw distance ensures your visuals are sharp, aligned, and immersive. Getting the height and placement right can make your setup feel as expansive as an ultra wide monitor.
Why Height and Distance Matter
The height and distance of a projector are just as important as the screen size. Placing a projector too low or too high can cause keystone distortion, uneven brightness, or unwanted shadows. Similarly, incorrect short throw projector distance can result in an image that is too small, too large, or improperly aligned with the screen. By carefully measuring and setting up the projector, you can enjoy a perfect, cinematic experience even in smaller rooms.
Step 1. Understand Your Projection Throw Distance
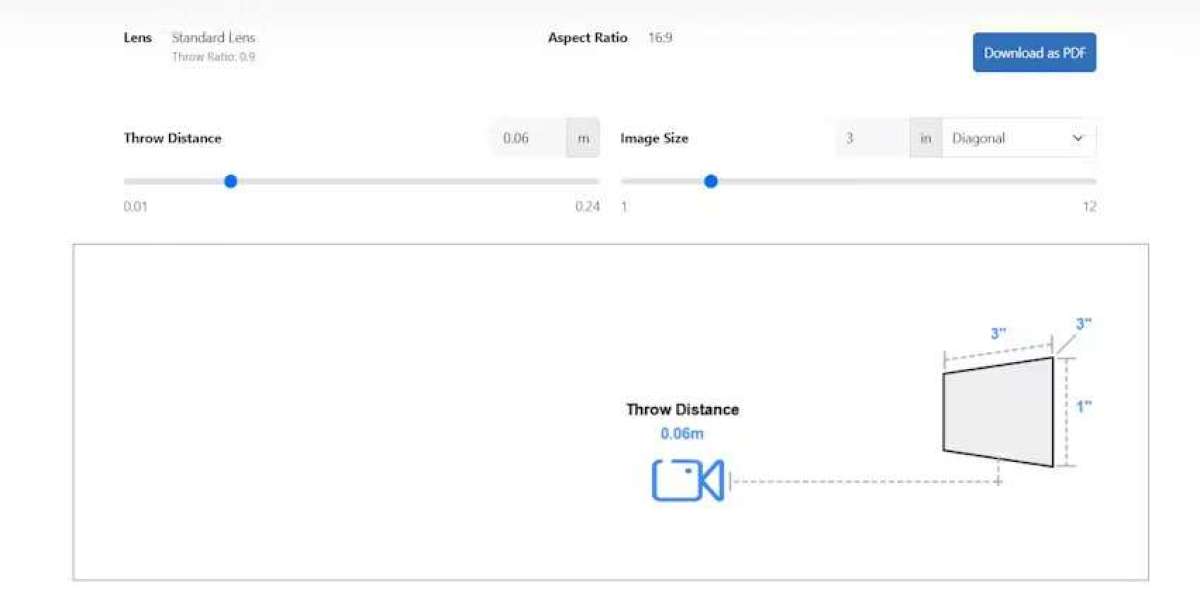
Before setting the projector height, you must understand the projection throw distance. This is the distance between the projector lens and the screen. Each projector has a throw ratio that defines how far the projector should be from the screen to achieve a particular image size. Short throw projectors usually have a throw ratio between 0.4:1 and 1.0:1, which means you can produce a large image from a relatively short distance.
Knowing the throw distance helps you determine the correct height and placement of the projector. Calculating this accurately ensures that your image fits perfectly on the screen and avoids distortions.
Step 2. Decide on Screen Size
The screen size affects both the height and the distance of the projector. Measure the width and height of the intended screen area. Short throw projectors can display large images in limited spaces, so even a small room can accommodate a 100 inch or larger screen.
Once you have the screen dimensions, you can use the projector’s throw ratio to calculate the short throw projector distance. Multiply the screen width by the throw ratio to determine how far the projector should be from the screen. For instance, a projector with a throw ratio of 0.5:1 will need to be 4 feet away from an 8 foot wide screen.
Step 3. Determine the Optimal Height
Short throw projectors require careful attention to height to avoid image distortion. The projector lens should ideally be level with the bottom edge of the screen or slightly below it. Some projectors allow lens shift adjustment, which gives you more flexibility in vertical placement.
If the projector is mounted too high, the image may tilt downward, causing trapezoid distortion. If it is too low, the image may tilt upward or be blocked by furniture or viewers. Adjusting the height properly ensures that the projection is uniform, filling the screen evenly from top to bottom.
Step 4. Mounting or Table Placement
Depending on your room setup, you can place the projector on a tabletop, shelf, or wall mount. Tabletop placement offers flexibility if you plan to move the projector or test different distances. Wall or ceiling mounting provides stability and prevents accidental movement.
When mounting, ensure that the mount supports the projector’s weight and allows for fine adjustments. Properly installed mounts let you adjust both height and tilt to achieve the perfect alignment with the screen.
Step 5. Calculating Short Throw Projector Distance
Once the height is set, focus on the distance. Use the throw ratio to calculate how far the projector should be from the screen. This step is crucial because incorrect placement can result in images that are cropped or misaligned.
Measure from the projector lens to the screen surface, not the wall. Small errors in measurement can have a big impact on image quality. For precise setups, mark the floor or mount location based on these calculations before placing the projector.
Step 6. Align the Projector
After setting the height and distance, power on the projector and display a test pattern. Align the projector horizontally so that the image is centered on the screen. Adjust the tilt and leveling to ensure the image is straight and uniform.
Short throw projectors are sensitive to placement, so even minor adjustments can make a difference. Check that the image does not spill over the edges or create shadows at the bottom or sides of the screen. Proper alignment ensures your visuals remain crisp and immersive.
Step 7. Fine Tune Focus and Lens Adjustments
Once the projector is in place, adjust the focus to achieve a sharp image. Some short throw projectors include digital zoom or lens shift features, which help you refine the image placement. Use these tools to fine tune the picture, but avoid over-reliance on digital keystone correction, as it can slightly reduce image clarity.
Step 8. Manage Ambient Light
Even with the correct height and distance, ambient light can affect image quality. Use curtains or blinds to reduce sunlight or room lighting when needed. In brighter rooms, consider using an ambient light rejecting screen to maintain contrast and color saturation.
Proper room lighting control enhances the projection and gives you a viewing experience similar to an ultra wide monitor, even for multiple viewers.
Step 9. Connect Devices and Test
Connect your laptop, media player, or streaming device to the projector. Organize cables neatly and test the image from different angles in the room. Check both brightness and viewing comfort to ensure everyone has a clear and consistent view.
Adjust the projector settings for brightness, contrast, and color to match the room environment. Many projectors have preset modes for movies, gaming, or presentations that can improve your experience.
Step 10. Regular Maintenance
To maintain optimal performance, clean the projector lens and vents regularly. Dust can affect image sharpness and airflow. Ensure the projector is in a ventilated area to prevent overheating. Proper maintenance preserves the correct short throw projector distance and ensures consistent image quality over time.
Common Mistakes to Avoid
Incorrect Height
Placing the projector too high or too low can cause distortion and uneven brightness.Wrong Distance Calculation
Failing to use the throw ratio leads to images that are too large or too small.Ignoring Ambient Light
Bright rooms can wash out the image. Control lighting for best results.Relying Only on Digital Corrections
Physical alignment and placement are more effective for image clarity than digital adjustments alone.
Conclusion
Setting the optimal height and distance for a short throw projector is key to achieving the perfect picture. By understanding short throw projector distance, projection throw distance, and how far the projector should be from the screen, you can ensure a crisp, immersive, and properly aligned image.
Proper measurements, alignment, and adjustments allow your projector to deliver visuals that rival the experience of an ultra wide monitor. Whether for home entertainment, gaming, or professional presentations, following these steps ensures your short throw projector performs at its best, providing large, vibrant images even in small spaces.
Read more: https://social.japrime.id/read-blog/214917