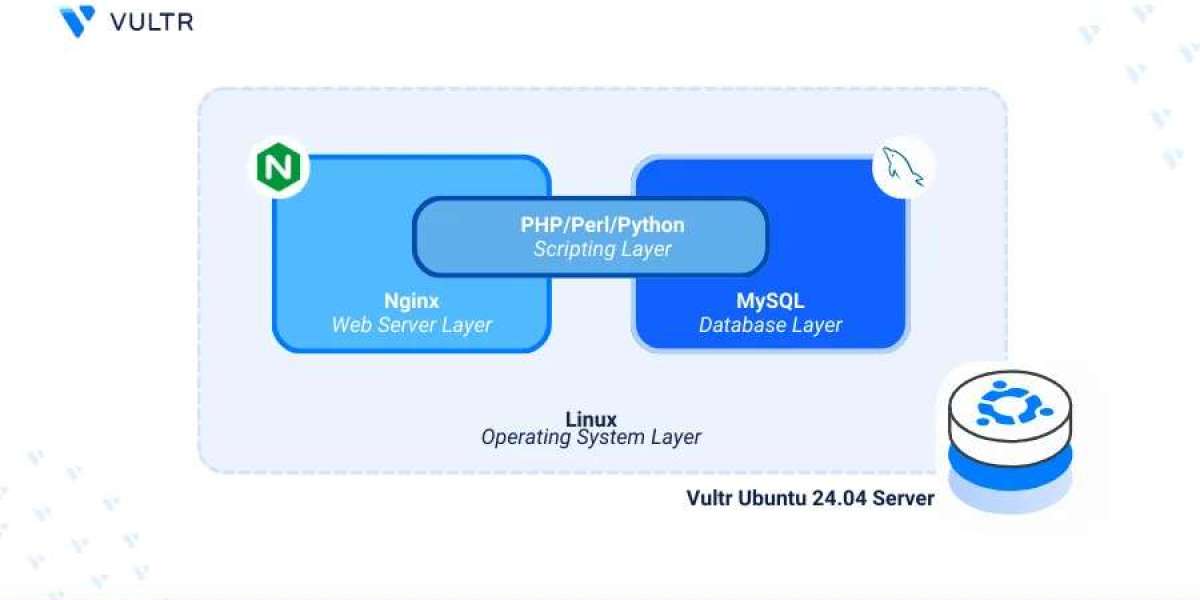
If you’re planning to host a dynamic website like WordPress or a custom PHP application, the LEMP stack offers a powerful, high-performance solution. Standing for Linux, Nginx, MySQL (or MariaDB), and PHP, LEMP is an open-source web platform that is fast, scalable, and widely supported by web developers. In this guide, you’ll learn how to install LEMP on Ubuntu 24.04 using simple terminal commands—ideal for VPS setups and cloud servers.
This blog is inspired by the detailed walkthrough available at Vultr’s LEMP installation tutorial, which provides a robust foundation for deploying modern web apps on Ubuntu.
Why LEMP for WordPress or PHP Apps?
Unlike the traditional LAMP stack (which uses Apache), LEMP uses Nginx, a lightweight and high-performance web server known for handling heavy traffic with minimal resource usage. This makes it a top choice for developers building scalable applications with WordPress, Laravel, Drupal, or any custom PHP framework.
Step 1: Update Your Server
Start by updating your system packages to the latest versions:
sudo apt update && sudo apt upgrade -y
This ensures your server is ready to handle new installations without any version conflicts.
Step 2: Install Nginx Web Server
Nginx is available in Ubuntu’s default repository:
sudo apt install nginx -y
After installation, start and enable the service:
sudo systemctl start nginx
sudo systemctl enable nginx
Check the status:
sudo systemctl status nginx
Open your browser and visit your server’s IP address to confirm the Nginx welcome page is displayed.
Step 3: Install MySQL (or MariaDB)
For your PHP application or WordPress site, you’ll need a database. MySQL is the most commonly used:
sudo apt install mysql-server -y
After installation, secure it:
sudo mysql_secure_installation
You’ll be asked to set a root password and disable insecure settings.
To access MySQL:
sudo mysql -u root -p
Create a database and user for your WordPress or PHP app.
Step 4: Install PHP and Required Extensions
Install PHP along with common extensions required for WordPress and other PHP apps:
sudo apt install php-fpm php-mysql php-curl php-gd php-xml php-mbstring php-zip php-bcmath -y
Check the PHP version:
php -v
Make sure php-fpm is running:
sudo systemctl status php8.2-fpm
Replace php8.2 with your installed PHP version if needed.
Step 5: Configure Nginx for PHP
Edit the default server block:
sudo nano /etc/nginx/sites-available/default
Modify it to handle PHP files correctly:
index index.php index.html index.htm;
location ~ \.php$ {
include snippets/fastcgi-php.conf;
fastcgi_pass unix:/run/php/php8.2-fpm.sock;
}
Save and test your configuration:
sudo nginx -t
Then reload Nginx:
sudo systemctl reload nginx
Step 6: Test PHP Processing
Create a test PHP file:
echo "<?php phpinfo(); ?>" | sudo tee /var/www/html/info.php
Step 7: Download and Configure WordPress (Optional)
To host WordPress:
Download the latest version:
wget https://wordpress.org/latest.tar.gz
Extract and move it to /var/www/html:
tar -xvzf latest.tar.gz
sudo mv wordpress/* /var/www/html/
Set permissions:
sudo chown -R www-data:www-data /var/www/html/
sudo chmod -R 755 /var/www/html/
3.Then visit your domain or IP to complete the WordPress setup via the browser.
Final Thoughts
By following this guide, you’ve successfully installed LEMP on Ubuntu 24.04, creating a fast and secure environment for hosting WordPress or any PHP-based application. The combination of Nginx, MySQL, and PHP offers excellent performance and flexibility for both personal projects and production-level web apps.
For advanced options and server hardening, explore Vultr’s full tutorial, which offers detailed insight into firewall setup, SSL integration, and more.