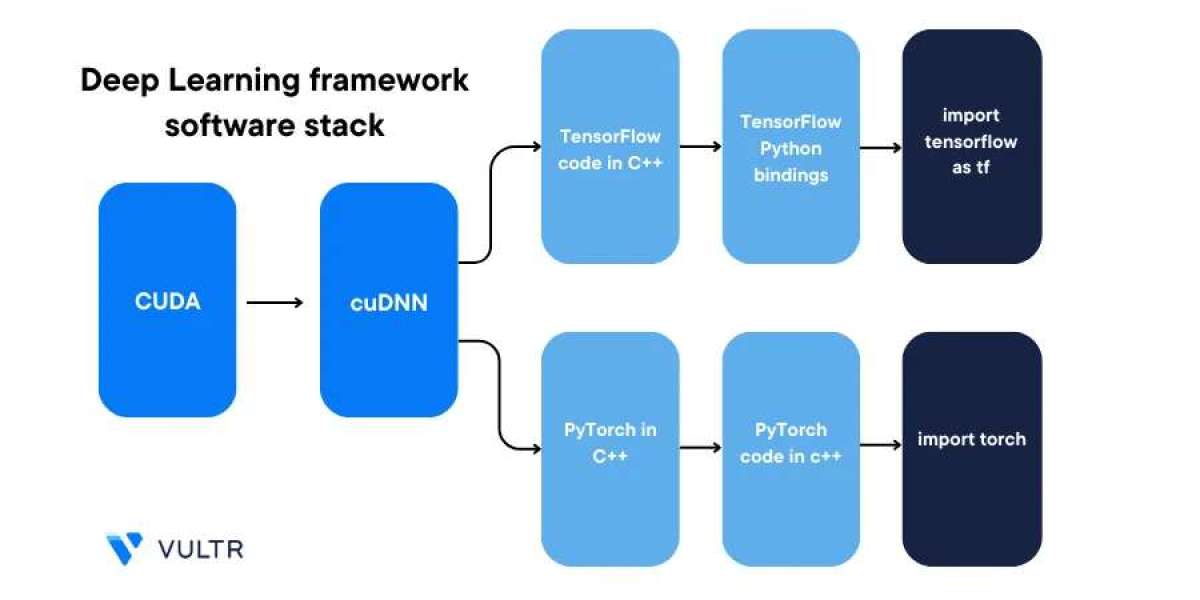
When it comes to building deep learning and AI applications on Linux, cuDNN (CUDA Deep Neural Network library) plays a critical role in optimizing GPU performance. NVIDIA’s cuDNN library is specifically designed to speed up the training and inference of neural networks using NVIDIA GPUs. If you're using Ubuntu for development, learning how to install cuDNN on Ubuntu 22.04 is a key step.
In this blog, we’ll break down the process based on the reliable and detailed guide provided by Vultr Docs. Follow these step-by-step instructions to get your development environment ready for GPU-accelerated AI tasks.
Why Install cuDNN?
cuDNN is essential if you’re using frameworks like TensorFlow, PyTorch, or Keras with GPU support. It allows for high-performance primitives needed in deep learning applications. Installing cuDNN ensures that your system leverages the power of your NVIDIA GPU to significantly accelerate training times and improve computation efficiency.
Prerequisites
Before you install cuDNN on Ubuntu 22.04, ensure the following:
You’re running Ubuntu 22.04 LTS.
Your system has a supported NVIDIA GPU installed.
CUDA Toolkit is installed and properly configured.
You have sudo privileges to execute system-level commands.
Your system is up to date.
You can update your system using:
sudo apt update && sudo apt upgrade -y
Step-by-Step Guide to Install cuDNN on Ubuntu 22.04
1. Verify CUDA Installation
First, make sure the CUDA Toolkit is installed. Run:
nvcc --version
If you don’t see version details, you’ll need to install CUDA before proceeding. The Vultr Docs guide includes helpful steps to install CUDA on Ubuntu 22.04 as well.
2. Download cuDNN from NVIDIA
Go to the official NVIDIA cuDNN download page and log in to your NVIDIA Developer account. Select the correct cuDNN version compatible with your CUDA installation.
For Ubuntu 22.04, download the following .deb files:
libcudnn8_x.x.x-1+cudaX.x_amd64.deb
libcudnn8-dev_x.x.x-1+cudaX.x_amd64.deb
libcudnn8-samples_x.x.x-1+cudaX.x_amd64.deb
Make sure you download the correct versions that match your existing CUDA Toolkit.
3. Install cuDNN Packages
Navigate to the directory where you downloaded the files and install them using the following commands:
sudo dpkg -i libcudnn8_*.deb
sudo dpkg -i libcudnn8-dev_*.deb
sudo dpkg -i libcudnn8-samples_*.deb
These commands will install the runtime library, development headers, and sample projects for cuDNN.
4. Verify Installation with Sample Code
To ensure everything was installed correctly, you can compile and run a sample program provided by cuDNN:
cp -r /usr/src/cudnn_samples_v8/ $HOME
cd $HOME/cudnn_samples_v8/mnistCUDNN
make clean && make
./mnistCUDNN
If successful, you’ll see output confirming that the cuDNN library is working correctly and your setup is complete.
Troubleshooting Tips
Here are some common issues and their solutions:
Dependency Errors: If you run into missing dependency issues, run sudo apt --fix-broken install and reattempt the cuDNN installation.
Permission Denied: Ensure you’re using sudo for all installation commands.
Version Mismatch: Double-check that your cuDNN version matches your installed CUDA version to avoid compatibility issues.
Conclusion
Installing cuDNN may sound complex, but thanks to resources like the Vultr Docs step-by-step guide, the process becomes much easier. With the proper setup, your Ubuntu system can now fully utilize GPU power for AI and machine learning workloads.
Whether you're a beginner experimenting with neural networks or a professional developing large-scale AI applications, knowing how to install cuDNN on Ubuntu 22.04 will save you time and deliver optimal performance for your models.