Their primary function is to transfer heat between two or more fluids without mixing them. Due to their critical function, maintaining the heat exchanger performance and efficiency is essential for system longevity, energy savings, and operational safety.
In this comprehensive guide, we will explore how to maintain and clean your heat exchanger effectively to ensure it operates at maximum efficiency. We’ll cover the importance of regular upkeep, step-by-step cleaning procedures, and best maintenance practices.
Understanding the Importance of Heat Exchanger Maintenance
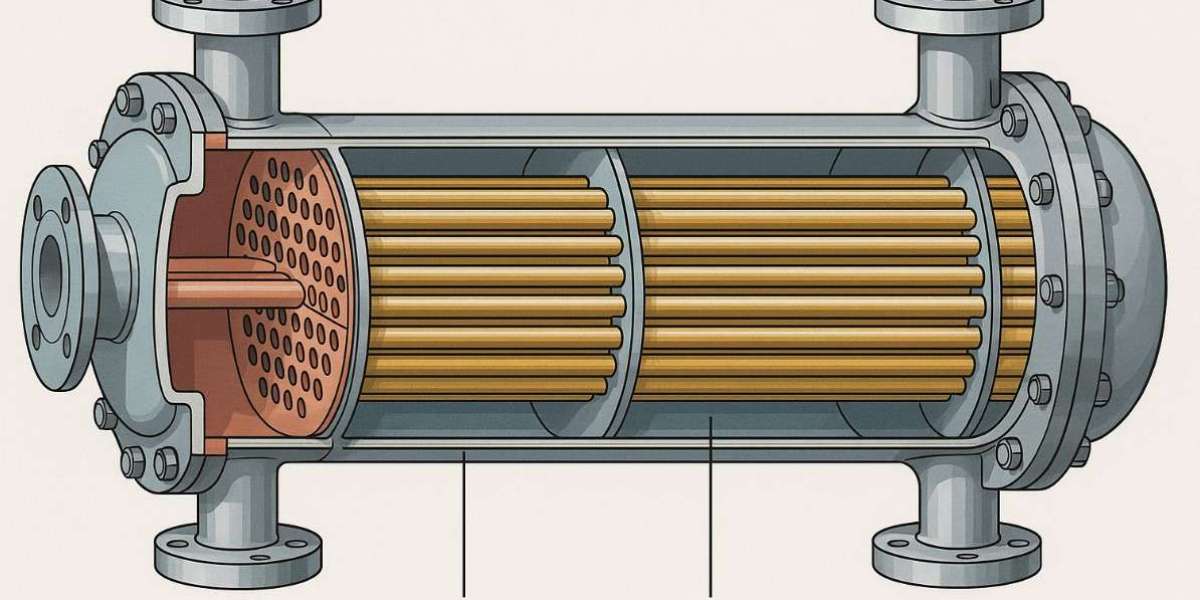
Heat exchangers work by transferring heat between fluids, which may be gases or liquids. Over time, dirt, scale, corrosion, and other deposits can accumulate inside or on the surface of the heat exchanger. These deposits create an insulating layer that reduces heat transfer efficiency and forces the system to work harder, consuming more energy.
Why Regular Maintenance Matters:
Energy Efficiency: A clean heat exchanger requires less energy to achieve the desired temperature transfer, saving on energy costs.
Prolong Equipment Life: Regular cleaning prevents corrosion and scaling, extending the lifespan of your heat exchanger.
Prevent Downtime: Unexpected failures due to fouling can cause costly system shutdowns.
Maintain Safety: Excessive buildup can cause pressure drops or leaks, posing safety hazards.
Common Types of Heat Exchanger Fouling
Before diving into maintenance and cleaning, it’s essential to understand the typical types of fouling that can affect a heat exchanger:
Scaling: Mineral deposits, such as calcium carbonate, form hard layers that resist heat flow.
Biological Growth: Algae, bacteria, and other microorganisms can thrive in warm, moist environments, creating biofilms.
Particulate Fouling: Dirt, dust, and suspended solids can clog surfaces and tubes.
Corrosion Fouling: Chemical reactions between the heat exchanger material and fluids cause rust or other corrosion products to form.
Chemical Reaction Fouling: Sometimes fluids chemically react to form sticky or hard deposits.
Identifying the fouling type can help tailor the cleaning method for your heat exchanger.
How to Maintain Your Heat Exchanger for Optimal Performance
Maintaining a heat exchanger involves regular inspections, monitoring system parameters, and preventive measures to reduce fouling buildup.
1. Schedule Regular Inspections
Set up a routine inspection schedule based on your heat exchanger’s operating conditions and manufacturer’s guidelines. Inspections should include:
Visual checks for leaks, corrosion, and physical damage.
Measuring temperature and pressure differentials to spot abnormal performance.
Sampling fluids to check for contaminants.
2. Monitor Operating Conditions
Keep an eye on fluid flow rates, temperatures, and pressures. Sudden changes can indicate fouling or mechanical issues.
3. Use Proper Water Treatment
If your heat exchanger uses water as a heat transfer fluid, water quality management is critical. Treat water to control hardness, pH, and microbial growth to minimize scaling and biofouling.
4. Maintain Clean Filtration Systems
Filters upstream of the heat exchanger prevent particulate matter from entering and causing fouling. Regularly clean or replace these filters.
Step-by-Step Guide to Cleaning Your Heat Exchanger
Cleaning methods vary depending on the type of heat exchanger (shell and tube, plate, finned tube, etc.) and the nature of fouling. Here is a general procedure you can follow for most heat exchangers:
Step 1: Prepare the System
Shut down the system and isolate the heat exchanger.
Drain fluids from the exchanger to avoid spills and hazards.
Ensure the unit has cooled down to a safe temperature before starting.
Step 2: Disassemble if Necessary
For some heat exchangers like plate heat exchangers, partial disassembly is required to access the heat transfer surfaces. Follow manufacturer instructions carefully.
Step 3: Mechanical Cleaning
Use brushes, scrapers, or high-pressure water jets to remove loose deposits.
Avoid abrasive tools that can damage surfaces.
For shell and tube exchangers, tube cleaning brushes or specialized tube cleaners can be used.
Step 4: Chemical Cleaning
If deposits are stubborn, chemical cleaning may be necessary:
Choose an appropriate cleaning solution based on the fouling type, such as descaling agents for mineral deposits or biocides for biological fouling.
Circulate the cleaning chemical through the heat exchanger, allowing sufficient contact time.
Rinse thoroughly with clean water after chemical treatment to remove residues.
Step 5: Inspect and Reassemble
After cleaning, inspect all parts for damage.
Replace gaskets or seals if worn.
Reassemble the heat exchanger carefully.
Step 6: Test the System
Refill with fluids and gradually restart the system.
Monitor temperatures, pressures, and flow rates to confirm restored efficiency.
Tips to Prolong Heat Exchanger Efficiency
Implement a Preventive Maintenance Schedule: Avoid waiting for problems; act proactively.
Use Corrosion-Resistant Materials: If upgrading or replacing parts, choose materials less prone to corrosion.
Optimize Operating Conditions: Avoid extreme temperatures and pressure that accelerate fouling.
Educate Operators: Training personnel to recognize early signs of fouling or damage ensures timely intervention.
Keep Records: Maintain logs of maintenance, cleaning activities, and system performance for trend analysis.
Signs Your Heat Exchanger Needs Cleaning
Recognizing when your heat exchanger requires attention can prevent costly breakdowns. Watch for:
Decreased heat transfer efficiency, such as longer times to reach target temperatures.
Increased energy consumption or fuel costs.
Higher pressure drops across the exchanger.
Visible leaks or corrosion spots.
Unusual noises or vibrations.
Conclusion
Your heat exchanger is a critical component that demands regular care to perform efficiently and safely. By understanding the causes of fouling and following a systematic maintenance and cleaning plan, you can maximize its lifespan, reduce energy consumption, and maintain optimal system performance.
Routine inspections, proper water treatment, mechanical and chemical cleaning, and attention to operational conditions are key steps to keeping your heat exchanger in prime condition. Investing time and effort into its maintenance pays off with improved efficiency and reliability.