Designing a home theater can be one of the most rewarding projects for any entertainment enthusiast. However, even with the best projector on the market, you might not achieve the perfect image if it is not placed correctly. Projector placement plays a critical role in determining image sharpness, brightness, and overall viewing experience. XTEN-AV brings you this detailed guide to help you understand how to position your projector for optimal performance. Whether you are setting up your first home theater or upgrading your current one, this guide serves as a valuable addition to your Home Theater Projector Buying Guide.
Why Placement Matters in a Home Theater Setup
Projector placement is more than just finding a convenient spot on a table or ceiling. It directly impacts image alignment, brightness uniformity, and even sound quality. When your projector is correctly positioned, you get a clear, bright, and distortion-free image that enhances your movie nights.
Improper placement, on the other hand, can lead to uneven brightness, image distortion, or unnecessary strain on the projector lens. To get the most from your investment, it is crucial to understand how throw distance, screen size, and room layout influence placement decisions.
Understanding Throw Distance and Image Size
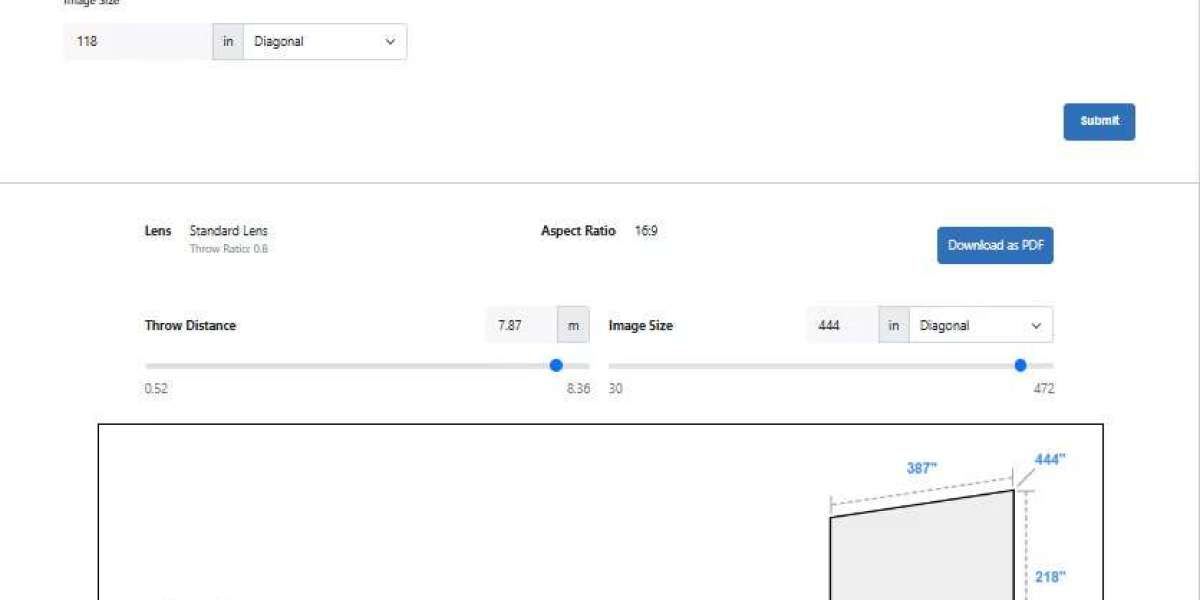
The first step in perfect projector placement is understanding throw distance. This refers to the space between the projector lens and the screen. The throw distance determines the size of the projected image.
Different projectors are designed with varying throw ratios, which is the relationship between distance and image size. For example, a 1.5:1 throw ratio means the projector must be 1.5 feet away from the screen for every 1 foot of image width.
Here are the three main types of projectors based on throw distance:
Short throw projectors: Can project large images from a short distance (3 to 5 feet). Perfect for smaller rooms.
Standard or long throw projectors: Require 8 to 15 feet or more for larger screens. Suitable for spacious rooms.
Ultra-short throw projectors: Sit directly under the screen and still project large visuals. Ideal for limited spaces or modern living rooms.
Before finalizing your projector, check its throw ratio in the specifications. This will help you calculate where to place it to achieve your desired screen size.
Choosing the Right Height and Angle
One of the most common mistakes beginners make is placing the projector at the wrong height. If the projector is not aligned properly with the screen, you may experience keystone distortion—where the image appears trapezoidal instead of rectangular.
Here is how to fix that:
Lens alignment: The lens should be horizontally centered with the screen.
Vertical placement: The projector should either be level with the bottom of the screen (for table placement) or aligned with the top edge (for ceiling mounting).
Avoid tilt adjustments: While most projectors come with keystone correction features, relying on them too much can reduce image quality. Physical alignment is always better.
Ceiling mounting offers the cleanest look and keeps the projector out of the way. However, make sure you use a sturdy mount that allows fine-tuning of tilt and rotation.
Calculating the Perfect Screen Size
The size of your projection screen should match the size of your room and your seating distance. A general rule of thumb is that your seating position should be about 1.5 times the diagonal size of your screen.
For example:
For a 100-inch screen, sit about 10 to 12 feet away.
For a 120-inch screen, 12 to 15 feet is ideal.
A screen that is too large can cause eye strain, while one that is too small can reduce immersion. Choose a size that feels natural for your space and projector capabilities.
Controlling Ambient Light for Better Quality
Light control is one of the biggest challenges in home theater setups. Even the best projectors struggle in brightly lit rooms. To achieve the best picture quality, you need to minimize ambient light.
Here are a few tips:
Use blackout curtains or blinds to darken the room.
Paint the walls in darker shades to reduce reflection.
Consider using ambient light-rejecting (ALR) screens if you cannot control natural light completely.
Remember, the darker your room, the more vivid and contrast-rich your image will appear.
Placement Options: Ceiling Mount vs Tabletop Setup
Both ceiling and tabletop placements have advantages depending on your room setup and preferences.
Ceiling Mount Placement:
Ideal for permanent setups.
Keeps the projector out of the way.
Provides a clean, organized look.
Requires precise alignment and proper cabling.
Tabletop Placement:
Easier to install and adjust.
Perfect for temporary setups or renters.
Requires a stable surface at the correct height.
If you choose a tabletop setup, ensure that no objects block the beam, and the projector remains stable during use. For ceiling installations, plan cable management carefully to maintain a neat appearance.
Audio Considerations in Placement
Sound is a crucial part of the home theater experience, yet many people overlook how projector placement affects audio. Some projectors have built-in speakers, but these often produce limited sound.
If your projector is placed far behind the seating area (common in long throw setups), audio might not feel immersive. To fix this, connect external speakers or a soundbar placed near your screen. Position speakers at ear level and maintain symmetry for balanced audio output.
Avoiding Common Placement Mistakes
Here are a few errors to avoid when setting up your projector:
Ignoring ventilation: Projectors generate heat. Do not place them in enclosed cabinets or too close to walls. Allow proper airflow.
Placing off-center: Even a small shift can cause image misalignment. Always measure and center the projector accurately.
Wrong throw distance: Not checking the throw ratio can result in an image that is too small or too large for your wall.
Overusing keystone correction: It should only be used for minor adjustments. Physical alignment is always better.
Avoiding these mistakes ensures long-term reliability and consistent picture performance.
Testing and Fine-Tuning
Once you have placed your projector, spend some time testing and fine-tuning. Adjust focus, zoom, and lens shift (if available) until the image looks sharp and evenly bright. Use a test pattern or grid to ensure all edges are straight and symmetrical.
Also, check for color accuracy by watching a few movie scenes or calibration videos. If your projector supports image presets like Cinema, Game, or Vivid, experiment to find the one that looks best for your environment.
Final Thoughts
Proper placement is the key to unlocking your projector’s full potential. It ensures your visuals are sharp, balanced, and perfectly aligned for a cinematic experience. Whether you are using a short throw or long throw model, the right positioning can make all the difference in your viewing quality.
XTEN-AV recommends that before installation, you assess your room layout, light conditions, and seating arrangement to determine the best spot for your projector. Following this placement guide along with a Home Theater Projector Buying Guide will help you create a truly immersive setup.
With careful planning and precise alignment, you can transform any room into a professional-grade home theater that delivers outstanding picture quality every time you press play.
Read more: https://ivebo.co.uk/read-blog/194701